Sunday, December 28, 2014

Peanut Brittle

Aka:

THE BEST NUT BRITTLE YOU’LL EVER MAKE: EASY, DELICIOUS, AND DONE IN UNDER 30 MINUTES.


1 cup granulated sugar
1/2 cup light corn syrup
1 1/2 cups salted peanuts
1 tablespoon butter
1 teaspoon baking soda
1 teaspoon vanilla extract


Directions
1) Spray a wooden spoon (or other heat-proof stirring implement) with non-stick cooking spray. Lightly grease a baking sheet, or line it with parchment.
2) Mix together the sugar and corn syrup in a large microwave-safe bowl and stir until well combined; the mixture will be stiff and hard to stir. Be sure to use a large enough bowl; the sugar/corn syrup should fill it no more than 1/4 to 1/3 full.
3) Microwave the sugar mixture uncovered on high power for 5 minutes; it will bubble vigorously.
4) Add the peanuts and butter, and stir well to combine. Speed is key! The cooler the mixture becomes the harder it will be to stir.
5) Replace the bowl in the microwave and cook on high for 2 to 4 minutes, until the mixture turns a nice medium-brown caramel color. Start watching carefully around the 2-minute mark, and remove when the caramel color is achieved.
6) Add the baking soda and vanilla. The mixture will bubble furiously upon the addition of these ingredients — this is what gives the candy its hallmark airy texture. (This is also why you need to use a large bowl.) Stir quickly to combine. The finished mixture will look creamy and caramelized.
7) Working quickly, pour the mixture onto your prepared baking sheet and spread it as evenly as possible. If you end up with an uneven spread, don't worry — the candy should still set up nicely, even in the thicker areas.
8) Once the brittle has set and cooled (30 to 60 minutes), break it into pieces.
Yield: about 3 dozen pieces.

NOTES:
  • There are lots of pictures of every step over here at King Arthur Flour.
  • Highly recommended!  This reminded me of the peanut brittle Grandpa used to make every Christmas but so much easier in the microwave.
  • Mine took about 10 minutes longer in my ancient microwave, but I just kept stirring and checking every minute or two until it was the right color.
  • It's worth noting that even though I used a clear glass bowl I had to take it out and look inside the bowl at the color.  It was definitely a different color in the middle of the bowl than on the edges.  Weird eh?  Even so, it would have overcooked had I waited until the outside color were dark enough.
  • They aren't kidding when they say it goes fast - be prepared.  I poured this on my room temperature baking sheet and barely got it spread before it set.  Note to self: next time, try warming up the pan a bit.

Friday, December 19, 2014

Hanson's Ginger Cookies

1 c. (2 sticks) butter
1 c. granulated sugar
1 c. light molasses
1 tbsp. vinegar
2 eggs, slightly beaten
51/2 c. flour
1 tsp. cinnamon
1 tsp. ginger
1 tsp. baking soda
1/2tsp. salt

For frosting:
2 c. powdered sugar
1/3c. unsalted butter, softened
1/2tsp. vanilla extract
2 to 3 tbsp. milk

To make cookies: In a large saucepan over medium heat, combine butter, granulated sugar, molasses and vinegar and slowly bring to a boil. Remove from heat, cool to room temperature and whisk in eggs.

In a large bowl, combine flour, cinnamon, ginger, baking soda and salt. Stir flour mixture into molasses mixture until dough is smooth and satiny. Divide dough (it will be extremely soft) into 2 portions. Wrap each portion in plastic wrap and refrigerate for at least 2 hours or up to several days.

When ready to bake cookies, preheat oven to 375 degrees. Let dough stand at room temperature for a few minutes until it is pliable enough to roll. Roll dough out on a board (flour is not needed) and cut using favorite cookie cutters. Bake on lightly greased baking sheets for 10 minutes. Remove from oven, let rest for 5 minutes then remove cookies to a wire rack and cool completely.

To make frosting: In bowl of an electric mixer on medium speed, beat powdered sugar, butter, vanilla and 2 tablespoons milk, adding more milk until frosting is consistency required. Frost completely cool cookies and serve.

NOTES:
  • These roll well and make really good gingerbread men.
  • My original recipe is a newspaper cut out from the Star Trib and calls for a cup of margarine rather than the butter called for in this version.  The butter would obviously taste better, but I've been making these for years with margarine.
  • They make great tree ornaments and the cookies store really well.
  • I have a note that a double batch makes 30 big gingerbread men. (I gave them as gifts one year.)
  • Source

Raspberry Almond Shortbread Thumbprints

Cookie
1 cup butter, softened
2/3 cup sugar
1/2 teaspoon almond flavoring
2 cups all-purpose flour
1/2 cup seedless raspberry jam in a squeezable container

Glaze
1 cup powdered sugar
2 to 3 teaspoons water
1 1/2 teaspoons almond extract

Combine softened butter, sugar and 1/2 teaspoon almond flavoring in bowl. Beat at medium speed, scraping bowl often, until creamy. Add flour; beat at low speed, scraping bowl often, until well mixed. Cover; refrigerate at least 1 hour or until firm.

Heat oven to 350°F.

Shape dough into 1-inch balls. Place 2 inches apart onto ungreased cookie sheets. Make indentation in center of each cookie with thumb (edges may crack slightly). Fill each indentation with about 1/4 teaspoon jam.

Bake 14-18 minutes or until edges are lightly browned. Let stand 1 minute on cookie sheets; remove to cooling rack. Cool completely.

Combine all glaze ingredients in bowl with whisk until smooth. Drizzle over cookies.

NOTES:

  • Really outstanding cookie
  • The squeezable jam isn't essential, but really does make everything easier.
  • Source


Monday, December 15, 2014

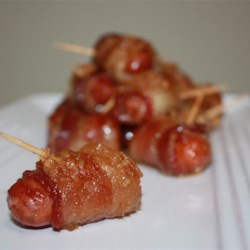
Bacon Wrapped Smokies

Easiest appetizer ever!

1 pound bacon (each slice cut into fourths)
14 ounce pkg of beef cocktail wieners (or more)
3/4 c brown sugar


  • Preheat oven to 325 degrees
  • Wrap wieners with quarter slices of bacon.
  • Secure with toothpicks
  • Place on a baking sheet lined with parchment (foil/silicone baking mat)
  • Sprinkle brown sugar over each
  • Bake for 40 minutes util the bacon is cooked and sugar is bubbly.
  • Serve immediately or place wieners in a slow cooker and keep on the low setting.
NOTES:
Delicious and very easy.
The original recipe said to cut the bacon in thirds, but it was very easy to stretch a quarter slice around.

Saturday, November 29, 2014

Swiss Potatoes


  • 3 1/2 pounds russet potatoes, peeled, cut into 1/8 inch slices
  • 1 1/2 teaspoons dried dill weed
  • 3 cups grated Gruyere cheese (about ten ounces) or it works with
  • regular Swiss cheese which is much cheaper and still tastes good
  • 1 1/3 cups whipping cream
  • 1 1/3 cups chicken stock or canned low-salt broth
  • 1/4 cup Dijon mustard

Preheat oven to 400 degrees.  Butter 13x9x2-inch glass baking dish.
Overlap 1/3 of potatoes in prepared dish.  Season generously with salt and pepper.  Sprinkle with 1/2 teaspoon dill weed and 1 cup cheese. Repeat layer twice,  using 1/3 cup of potatoes, 1/2 teaspoon dill weed and 1 cup cheese for each layer.  Whisk cream, stock and mustard in bowl.  Pour over potatoes.  Bake until potatoes are tender and the top is crusty and brown, about 1 hour.  Cool 10 minutes and serve.

NOTES:

  • This was Johnny's one request for Thanksgiving dinner. :)
  • Holly says: "Also does not require whipping cream; I'm sure I always use milk/half & half."
  • I used the mandolin for cutting potatoes - worked very well.

Tuesday, October 14, 2014

Ribs in the Oven

4-5 pounds spare ribs or baby back ribs
1/4 cup Dijon mustard
2 teaspoons liquid smoke (optional)
1 cup Dry Spice Rub
1 cup Barbecue Sauce

Dry Spice Rub (use ¼ batch)

2 cups brown sugar
1/2 cup paprika
1/4 cup + 2 tablespoons granulated garlic
1/4 cup granulated onion
1/4 cup kosher salt
1/4 cup black pepper
1/4 cup cumin
1/8 cup ancho or chipotle
1/4 cup mustard powder
1/8 cup cayenne pepper

Line a baking sheet with aluminum foil and set the cooling rack on top. Lay the ribs on top of the rack in a single layer. This arrangement allows for heat circulations on all sides of the ribs.

Mix the mustard and the liquid smoke, if using, and brush the ribs on both sides. Sprinkle the ribs with the dry rub and pat gently to make sure the rub adheres to the rib meat. Note: This step can be done the day ahead for a deeper flavor. Wrap the seasoned ribs in plastic wrap and refrigerate.

Heat the broiler and place an oven rack a few inches below the heating element. Make sure the meaty side of the ribs is facing up. Broil the ribs for about 5 minutes, until the sugar in the dry rub is bubbling and the ribs are evenly browned.

Set the oven to 300°F. Move the ribs to an oven rack in the middle of the oven. Roast for 2½–3 hours for spare ribs or 1½–2 hours for baby back ribs. Halfway through cooking, cover the ribs with aluminum foil to protect them from drying out.

About 30 minutes before the end of cooking, brush the ribs with barbecue sauce, re-cover with foil, and finish cooking. The ribs are done when a knife slides easily into the thickest part of the rib meat. Let them rest, covered, for about ten minutes, and then cut between the bones to separate the individual ribs. Serve.

Source.

Tuesday, October 7, 2014

Chicken Stroganoff

Making a note of this because it was a big hit (even with the forgotten paprika).  I served it with brown rice instead of noodles, which was also lauded.  Original here.

Ingredients
Kosher salt
12 ounces wide egg noodles (or rice)
3 tablespoons unsalted butter
1 small onion, chopped
4 ounces white or cremini mushrooms, sliced (about 2 cups)
1 1/4 pounds skinless, boneless chicken thighs, cut into chunks
2 tablespoons all-purpose flour
1 teaspoon paprika, plus more for topping
Freshly ground pepper
1 cup fat-free low-sodium chicken or mushroom broth
1 tablespoon Worcestershire sauce
1/2 cup sour cream, plus more for topping
2 tablespoons chopped fresh parsley


Bring a large pot of salted water to a boil. Add the noodles and cook as the label directs, then drain.

Meanwhile, melt 2 tablespoons butter in a large skillet over medium-high heat. Add the onion and cook until slightly soft, about 2 minutes. Add the mushrooms and cook, stirring, until they begin to brown, about 2 minutes. Add the remaining 1 tablespoon butter, the chicken, flour, paprika, 1 teaspoon salt and 1/4 teaspoon pepper. Cook, stirring, until the chicken browns, about 3 minutes.

Add the chicken broth and Worcestershire sauce and bring to a gentle simmer; cook until thickened, about 5 minutes. Stir in the sour cream and season with salt and pepper. Continue simmering gently until the chicken is cooked through, about 2 more minutes.

Divide the noodles among plates. Top with the chicken mixture, parsley, some sour cream and paprika.

Friday, October 3, 2014

Caramel Coffee Syrup

Makes 1 cup(source)
  • 1 cup sugar 
  • ¾ cup water, divided 
  • 1 teaspoon corn syrup 
  • 1 teaspoon vanilla extract 
  • Pinch of salt 
In a small pot, combine the sugar, ¼ cup of the water, and the corn syrup. Stir over low heat until dissolved, then turn the heat to medium high, cover the pot, and let boil for 2 to 3 minutes. Remove the cover and stir vigorously as the caramel continues to cook. Stir over heat until mixture is a light amber color. Remove the caramel from heat. Carefully pour in the remaining ½ cup of water. Be very careful when stirring the water into the caramel as it can splatter. Stir in the vanilla and a small pinch of salt.

Note: I'd recommend keeping this over low heat for a bit after you add the last ingredients. The added water can cause a bit of crystallization that you'll want to redissolve, and this will give the alcohol in the vanilla a chance to cook off (it wasn't noticeable in coffee, but might be in other applications).

Thursday, September 25, 2014

Apple Cinnamon Steel Cut Oats


2 apples, peeled, cored, cut into 1/2-inch pieces (2-1/2 to 3 cups chopped)
1-1/2 cups fat-free milk (or substitute non-diary alternative like almond milk)
1-1/2 cups water
1 cup uncooked steel-cut oats
2 tablespoons brown sugar (or substitute maple syrup or other desired sweetener)
1-1/2 tablespoons butter, cut into 5-6 pieces (optional)
1/2 teaspoon cinnamon
1 tablespoon ground flax seed
1/4 teaspoon salt

Optional garnishes: chopped nuts, raisins, maple syrup, additional milk or butter

Directions
Coat inside of 3-1/2 quart (or larger) slow cooker with cooking spray. Add all ingredients (except optional toppings) to slow cooker. Stir, cover, and cook on low for approx. 7 hours (slow cooker times can vary). Spoon oatmeal into bowls; add optional toppings, if desired. Store leftovers in refrigerator. Freezes well.

To reheat single servings: Put 1-cup cooked oatmeal in microwave proof bowl. Add 1/3 cup fat-free milk. Microwave on high for 1 minute; stir. Continue cooking for another minute, or until hot.

Recipe can be doubled in 6-quart or larger slow cooker. Increase cooking time 1 hour.

NOTES:

  • This recipe was a creamier texture than the other one I tried.
  • It made 4 generous servings (could also be 5 smaller ones).  We ate two right away and refrigerated the other two for later in the week.  It was better fresh, but microwaved just fine too.
  • I can't remember what kind of apple I used, but it was pretty bland.  I'd try something like a granny smith next time.
  • I bought a small crock pot just to try this recipe, but it seems to have a hot spot (evidenced by the very overcooked corner of things).  I'm going to return it and try a double boiler method in my regular crock pot next time.  (see below)
  • Source
  • UPDATES: I used the double boiler method below and it was perfect.  I also used two unpeeled granny smith apples this time and the apple flavor was much more pronounced.  I'd recommend both of these and will be making this recipe regularly throughout the winter.
  • Makes 5-6 servings and reheats well in the microwave.

Double Boiler Method:  (Source)
You can completely avoid burnt oatmeal edges and cook it for an extended time by turning your slow cooker into a double boiler. It's easy.

Find a heat-proof bowl that will nest inside your slow cooker.
Coat the inside of the bowl with cooking spray.
Add water to the slow cooker on the outside of the bowl, until it reaches approx. half way up the side of the bowl.
Add the oatmeal ingredients to the bowl, and stir.
Put the lid on the slow cooker and cook on low for up to 8 hours (it was ready sooner, but it held for 8 hours)
This method worked great for me. I had my slow cooker on for 8 hours of cooking, and then it went to the warm mode for awhile after that. There were absolutely no browned or burnt edges. The texture of the oats was perfect. Another benefit of this method--clean up is a breeze! I put the bowl in my dishwasher and dumped the water and dried inside of slow cooker with a towel--done!

Mediterranean Quinoa Salad


Salad

  • 1 cup quinoa
  • 1/2 tsp salt
  • 1 1/2 cups water
  • 2 diced tomatoes
  • 1 cup diced bell peppers
  • 1 cup diced cucumber
  • 1 cup chopped kalamata olives
  • 1/4 cup chopped green onion


For the Lemon Oregano Dressing

  • 1/4 cup extra virgin olive oil
  • 2 tbsp honey
  • juice and finely minced zest of one lemon
  • 2 tbsp chopped fresh oregano (or 1 tbsp dried oregano)
  • 1/2 tsp kosher salt
  • 1/2 tsp black pepper


Instructions

  • Bring the water, salt and quinoa to a boil over low heat.
  • Cover and simmer slowly for 15 to 20 minutes until the grains are cooked but still a little firm to the bite.
  • Remove from heat and add the tomatoes, peppers, cucumber, olives and green onion.
  • Toss everything together with the Lemon Oregano Dressing.
  • For the Lemon Oregano Dressing
  • Whisk together the olive oil, honey, lemon zest, oregano, salt and pepper.
  • Pour over the salad while warm and toss very well.


NOTES:

  • Healthy, easy, good for several days, uses garden ingredients I have now.
  • I got this recipe from Deb L.  She added cubed avocado and really liked it.
  • Source

Friday, September 12, 2014

Black Bean Soup

I don't know if this was the best soup I've ever eaten, but we did like it and it was easy enough to finish up the cooking when I got home from work.

1 1/2 Tablespoon olive oil
1 medium onion, diced
3 cloves garlic, minced
1 medium red bell pepper, seeded and diced
4 carrots, diced
3 ribs celery, thinly sliced
1 Tablespoon chili powder
1/2 teaspoon cumin
6 cups chicken broth
4 15-oz. cans black beans, drained and rinsed (you can also make your own recipe-ready black beans)
Salt and pepper
Saute onion, garlic, pepper, carrots, and celery in oil in a large saucepan over medium-high heat. Stir occasionally and cook until softened. Add chili powder and cumin and saute for a few more minutes.

Stir in broth and beans and bring to a boil. Reduce heat to low and simmer for 25 minutes. Stir occasionally.

Remove a few cups of the soup and puree in a blender. Stir pureed soup back into the soup, season with salt and pepper, and simmer for about 5 more minutes.

Serves 6.

NOTES:

  • This could easily be an "all Aldi" recipe and if you started with dried beans the cost per serving would be pennies for a very hearty soup.
  • I had turkey stock in the freezer from last Thanksgiving and used that instead of the broth.
  • I did the saute step this morning and reheated for the last 25 minutes when I got home later in the day.  
  • Guessing it would freeze well.
  • Easy and good.

Slow-Cooker Asian Braised Beef Short Ribs


Serves four to six.
(Source)
  • 1/4 cup chicken broth 
  • 3/4 cup hoisin sauce 
  • 3 scallions, white parts minced, green parts sliced thin 
  • 4 teaspoons Asian chili-garlic sauce 
  • 1 tablespoon instant tapioca 
  • 5 pounds bone-in English-style short ribs, excess fat trimmed 
  • Salt and pepper 
Combine broth, hoisin, scallion whites, chili-garlic sauce, and tapioca in slow cooker. Season short ribs with salt and pepper and nestle into slow cooker. Cover and cook until beef is tender, 9 to 10 hours on low or 6 to 7 hours on high.

Transfer short ribs to serving platter, tent loosely with aluminum foil, and let rest for 5 minutes. Skim excess fat from surface of sauce. Pour sauce over short ribs and sprinkle with scallion greens. Serve over rice.

Tuesday, September 9, 2014

Grandma's Cole Slaw

How could I not have posted this before?

First the "official" recipe:

  • 7/8 cup sugar
  • 3/4 tsp salt
  • 1 cup of mayonnaise
  • 1/4 c vinegar (calls for "tarragon or other")
  • 1/4 c salad oil
  • 1 small onion
  • 1 head of shredded cabbage

Now the version I usually make:

  • half of the dressing recipe (cut cabbage, especially when shredded, adds liquid to the recipe and a full batch of dressing is always too much, imo)
  • using miracle whip
  • and plain, white vinegar
  • skip the onion
  • medium/small head of cabbage
NOTES:
  • Quite often I don't measure very carefully - it's a pretty forgiving recipe.
  • It was originally from the A & W or Kentucky Fried Chicken restaurant in Staples and my recipe card calls it Ozzie's Cole Slaw.  (Ozzie Anglin? was the restaurant owner.)
  • It was cut down from a huge restaurant recipe, hence the 7/8 cup measurement.
  • If you use some red cabbage, add it at the last minute or the dressing will get all pink.


Crock Pot Barbecued Ribs


I made this in the crock pot today using boneless ribs I had left over from the adventure in the photo.
They were very easy and adding the baking step at the end made them better than the average, overcooked crock pot meat.

 3 pounds baby back ribs, trimmed
 salt and ground black pepper, to taste
 1/2 cup water
 1/2 onion, sliced
 1 clove garlic, minced
 1 (18 ounce) bottle barbeque sauce

Directions

  • Season ribs with salt and pepper.
  • Pour water into slow cooker. Layer the ribs into the slow cooker. Top the ribs with onion and garlic.
  • Cook on High for 4 hours (or Low for 8 hours).
  • Preheat oven to 375 degrees F (190 degrees C).
  • Transfer ribs to a baking sheet. Discard onion and garlic. Coat ribs with barbeque sauce.
  • Bake in preheated oven until the sauce caramelizes and sticks to the meat, 10 to 15 minutes.

NOTES:

  • I used boneless ribs
  • and less barbecue sauce than called for
  • Very easy with a better than average finish.  Quick enough to do after work.
  • Source

Friday, September 5, 2014

Mexican Biscuit Casserole

1 1/2 lb. hamburger
1 pkg taco seasoning mix
3/4 c water
1 16 ounce can kidney beans, undrained
1 11 ounce can corn w/ sweet peppers, drained

3 1/4 cups bisquick
1 c milk

3 c shredded cheese

  • Brown the hamburger, add water, seasoning mix, beans and corn.  Bring to boil.
  • Meanwhile, mix milk and bisquick and form biscuits.
  • Put meat mixture into a sprayed 9 x 13 dish.
  • top with at least half of the cheese and then place the biscuits on top of the hot meat mixture.
  • Bake at 350 for 20 minutes, or until the biscuits are lightly browned.  
  • Take out of the oven, top with remaining cheese and let sit for 5 minutes before serving.
NOTES:
  • Very easy and we all liked it.
  • Next time, change the meat to 1 pound, put it in a 9x9 baking dish and use half a batch of biscuits.  (We thought the meat to biscuit ratio was pretty low.)
  • Regarding the biscuits - this recipe could be made easier with a can of refrigerator biscuits.  It could be made tastier with a home made biscuit recipe.  Really, any would work.
  • This could be a freezer meal.  Just package the cooked meat mixture in a ziploc and package it with the right amount of cheese and a pack of frozen biscuits.  Assemble before serving, but it's probably worth noting that the meat would need to be reheated before assembly.  (Not sure if that's important or not, but the original recipe specifically says "hot."
  • Source.


Tuesday, July 29, 2014

Rhubarb Vodka

Just bookmarking it here so I can find it again.  Delicious!

3 pounds rhubarb, cut up

Mixed with
1 bottle vodka
1/4 cup grand marnier
Simple syrup (6 tablespoons sugar heated to boiling with 1/4 cup water)


Cool the syrup before mixing into the rest of the ingredients. 
Let stand 1-2 weeks in covered container.

Recipe is flexible - it originally called for 1/2 cup of the Grand Marnier, but my source preferred with less.


It's a lovely pink color and, according to reports, is dangerously good when mixed with 7-Up.

Sunday, July 20, 2014

Cherry Jam


After having this unproductive sour cherry tree in our yard for quite a few years, we were pleasantly surprised to see more than a few berries finally this year.  Tony beat the birds to them and I was able to make this recipe.

There was only a pound of usable fruit (pits removed), so I added another 1+ pounds of bing cherries to make the jam-making mess worthwhile.  I may regret that, since I've heard such fantastic things about sour cherry jam, but in the meantime, I'm sure we'll enjoy the few pints of mixed cherry jam I made this afternoon. I'll bookmark the recipe here (and below, in case it drops off the interwebs), just in case next year's yield is closer to the 4 pounds the recipe asks for.

Ingredients
  • 4 pounds of pitted and mashed sour cherries, which should yield about six cups of jammable fruit
  • 3 cups sugar
  • 1 packet liquid pectin (that's half a box)
Instructions
  • Put three pint jars or six half pints (or some combination thereof) in your canning pot and bring to a boil.
  • Combine fruit and sugar in a heavy, non-reactive pot. Bring to a boil and let bubble for a good twenty minutes, occasionally skimming the foam from the surface of the fruit as it develops. Add the pectin and boil for another five minutes. You want to cook it until it looks like boiling sugar - thick and viscous.
  • Kill the heat, fill your jars, wipe rims, apply the lids and rings and process in the hot water bath for 10 minutes. Remove jars from water and let cool on the countertop. When the jars are cool (I typically wait until overnight), remove the rings and test the seal by picking the jar up by the lid. If it stays put, your jars are good to store indefinitely.
  • I love the flavor of sour cherries, so I didn't add a drop of extra flavor to this jam. However, you are welcome to spice things up with cinnamon, nutmeg, cardamom, vanilla or orange (or anything else).

Saturday, July 19, 2014

Delicious Hot Dish

Brown in 2 tbls of butter:
  • 1 1/2 lbs ground beef
  • 3 c celery
  • 2 c chopped onions
Mix with:
  • 1 c uncooked rice (not minute rice)
  • 1 10-ounce can of cream of mushroom soup
  • 1 10-ounce can of chicken noodle soup
  • 2 soup cans of water
  • 3 tbls soy sauce
Cover and bake at 350 for one hour or more, until rice is fully cooked.

I've been trying to come up with some different recipes, and lately "different" = "retro."  In short, I pulled a bunch of things from my old recipe box that I haven't made in years.

This one is pure Minnesota comfort food, probably copied from something my Mom used to make.  Everyone was pleased with the "new" recipe and ate a ridiculous amount.  If I had a regular rotation (which I  don't, but probably should), this would be on it.

It's probably worth noting that I only used 1 pound of hamburger, and this would probably be classed up a bit if it used cooked chicken or turkey instead of the beef.

Tuesday, June 24, 2014

Rhubarb bars

CRUST
1 c flour
5 tbls powdered sugar
1/2 c butter, softened

FILLING
1 1/2 cups sugar
2 eggs
2 cups rhubarb
1/4 flour

Mix the crust ingredients.  Pat into a 9 x 13 pan.  Bake for 15 minutes at 350 degrees.
Mix filling ingredients and pour over the top of the baked crust.  Bake at 350 for an additional 35 minutes.  Cool and cut.

NOTES:

  • Delish and easy!
  • The crust was buttery and delicious.
  • The filling was a little sweet and could have used more rhubarb.  Next time try three cups of rhubarb with this amount of sugar or 1 1/4 cups of sugar with the 2 cups of rhubarb.
  • Source: Parish cookbook from Sacred Heart in Norfolk, NE (p. 222)

Crockpot Orange Chicken

4-6 boneless skinless chicken breasts3/4 cup orange marmalade3/4 cup barbecue sauce2 tbsp. soy sauce

  • Cook the chicken breasts in the crockpot on high for 3 hours.
  • Mix the three sauce ingredients together in a bowl
  • Drain the chicken and pour the sauce over it.
  • Continue cooking on high for an additional 30 minutes.
NOTES:
  • Source
  • The sauce is pretty outstanding.  I'm actually going to freeze the leftover sauce and try it on grilled chicken or pork.  It would also probably be excellent on baked chicken.
  • The original recipe recommended starting with thawed chicken (which I did), but it would also work with frozen.  The chicken was pretty overcooked, almost falling apart, but it was still very moist.
  • Everyone liked it :)


Sunday, June 22, 2014

Basic Lentils with Carrots

I don't know when we became Lentil People, but they seem to have become a Friday go-to for us. No photo, because they're lentils and not very attractive, but trust me, they're good. This is also a very versatile recipe: add more water/chicken stock for soup, add ham or bacon on a non-Friday, etc.
Ingredients
  • 1 tablespoon extra virgin olive oil

    1 medium yellow onion, chopped

    1 carrot, chopped

    3 cups water

    1 cup French green lentils, rinsed

    1 bay leaf

    1 teaspoon dried thyme

    Sea salt and pepper

In a medium saucepan, heat olive oil over medium heat. Add onion and cook until softened, stirring frequently, about 5 minutes. Add carrot, water, lentils, bay leaf, thyme, salt and pepper and bring to a boil. Simmer until lentils are tender, about 25 minutes. Remove bay leaf, adjust seasoning and serve.

Via Whole Foods


Tuesday, June 17, 2014

World's Best Hamburger Buns

  • Source: King Arthur Flour's Beautiful Burger Buns.  These were easier to make than going to the store for buns, and infinitely better. 

  • 3/4 to 1 cup lukewarm water
  • 2 tablespoons butter
  • 1 large egg
  • 3 1/2 cups King Arthur Unbleached All-Purpose Flour
  • 1/4 cup sugar
  • 1 1/4 teaspoons salt
  • 1 tablespoon instant yeast
  • *For best results (a smooth, slightly soft dough), use the smaller amount of water in summer (or in a humid environment), the greater amount in winter (or in a dry climate); and something in between the rest of the time.

topping


  • 3 tablespoons melted butter
1) Mix and knead all of the dough ingredients — by hand, mixer, or bread machine — to make a soft, smooth dough.
2) Cover the dough, and let it rise for 1 to 2 hours, or until it's nearly doubled in bulk.
3) Gently deflate the dough, and divide it into 8 pieces. Shape each piece into a round ball; flatten to about 3" across. Place the buns on a lightly greased or parchment-lined baking sheet, cover, and let rise for about an hour, until noticeably puffy.
4) Brush the buns with about half of the melted butter.
5) Bake the buns in a preheated 375°F oven for 15 to 18 minutes, until golden. Remove them from the oven, and brush with the remaining melted butter. This will give the buns a satiny, buttery crust.
6) Cool the buns on a rack.
Yield: 8 large buns.

Tuesday, May 27, 2014

Lime and Chili Rubbed Chicken Breasts

Molly has been recommending this recipe to me for quite awhile and I finally had all the ingredients plus good grilling weather all at the same time.

It's delicious and could not be easier!

2 teaspoons chili powder
2 teaspoons packed brown sugar
2 teaspoons grated lime peel
1/2 teaspoon salt
1/4 teaspoon garlic powder
1/8 teaspoon ground red pepper (cayenne)
4 boneless skinless chicken breasts (about 1 1/4 lb)
2 teaspoons olive or canola oil


  • Heat gas or charcoal grill. In small bowl, mix chili powder, brown sugar, lime peel, salt, garlic powder and ground red pepper. Rub both sides of chicken with oil, then with spice mixture.
  • Place chicken on grill over medium heat. Cover grill; cook 10 to 15 minutes, turning once or twice, until juice of chicken is clear when center of thickest part is cut (170°F).
Refrigerating the "rubbed" chicken 20 to 30 minutes before grilling really enhances the flavor.

You can bake the chicken. Place the rubbed chicken in a foil-lined shallow baking pan and bake in a 375°F oven for 25 to 30 minutes.


NOTES:

  • I dipped the first piece into the spices and it picked up way too much.  Lesson: rub, not dip.
  • Make extra pieces and serve it cold on salad.  You'll be glad you did!
  • Source

Tuesday, March 18, 2014

Corned beef and cabbage

SERVES 6 TO 8

Use flat-cut corned beef brisket, not point-cut; it’s more uniform in shape and thus will cook more evenly. When slicing the cabbage, leave the core intact or the cabbage will fall apart during cooking.

INGREDIENTS

1 (4- to 5-pound) corned beef brisket roast, rinsed, fat trimmed to 1/4 inch thick
4 cups low-sodium chicken broth
4 cups water
12 carrots, peeled (3 chopped, 9 halved crosswise)
2 celery ribs, chopped
1 onion, peeled and quartered
3 bay leaves
1 tablespoon whole black peppercorns
1 tablespoon minced fresh thyme
1 teaspoon whole allspice
3 tablespoons unsalted butter
1 1/2 pounds small red potatoes
1 head green cabbage (2 pounds), cut into 8 (2-inch) wedges
Pepper

INSTRUCTIONS

1. Adjust oven rack to middle position and heat oven to 300 degrees. Combine beef, broth, water, chopped carrots, celery, onion, bay leaves, peppercorns, thyme, and allspice in Dutch oven. Cover and bake until fork slips easily in and out of meat, 4½ to 5 hours.

2. Transfer meat to 13 by 9-inch baking dish. Strain cooking liquid through fine-mesh strainer into large bowl, discard solids, and skim fat from liquid. Pour 1 cup cooking liquid over meat. Cover dish tightly with aluminum foil and let rest for 30 minutes.

3. Meanwhile, return remaining cooking liquid to Dutch oven, add butter, and bring to simmer over medium-high heat. Add potatoes and simmer until they begin to soften, about 10 minutes. Add carrot halves and cabbage, cover, and cook until tender, 10 to 15 minutes. Transfer vegetables to serving platter and season with pepper to taste. (Reserve cooking liquid for making Creamed Chipped Beef using leftover corned beef; recipe at right.)

4. Transfer beef to carving board and slice against grain into ¼-inch-thick slices. Serve with vegetables.

NOTES:

  • This was really outstanding!  I started with a better than average piece of meat from Costco, so there was less fat to begin with, but even so, letting it rest while the veggies were cooking made it easy to slice nicely without the falling apart tendency I get when I cook it in the crock pot.
  • I did not add carrots to the beginning step (to be discarded later)
  • I also did not add the extra spices called for, since the spice packet with the meat seemed comparable. 
  • In particular, cooking the vegetables later made for really great texture and a not over salty flavor.  
  • I'd definitely do it this way again.
  • Source: Cook's Country

Sunday, March 9, 2014

A Water Upgrade

In a moment of weakness and dire thirst, I recently decided it was worth the buck and a half to get one of these delicious MetroMint products.  They really are very good, but when I got home and still had a partial bottle left over, I tried a little (very little) experiment and made my own version.  In a side-by-side taste test, I couldn't tell the difference.  Since then, I've been making this "recipe" pretty regularly, even to the point of washing out the bottle and reusing it for the rotation (one batch there and another in my beloved water bottle - one always cooling in the fridge and the other travelling with me).


Note: the only remotely "hard" thing about this process is measuring one drop.  I do have a bottle of doTERRA's Wild Orange with a convenient dropper lid, and I've tried a variety of things with the mint including covering the bottle opening with my finger, tipping it and then just sticking my finger in the water.  "Home Economist Sue" does not recommend this.  "Practical, I'm only making it for my own consumption Sue", does.

Friday, February 28, 2014

Paczki

While you kids possibly never had any traditional Polish food at Grandma Rose's house,* I do remember once or twice having some version of Paczki.  When she said it, it sounded a little different (like there was an "n" in the word), but that was probably just an ethnic accent sounding on my MN ears.

Anyway, I was just reading Brown Eyed Baker's recipe and the light came on that this is what Grandma was doing!  Hers were not filled and were rolled in granulated sugar.  She rolled the dough into little balls by hand before letting them rise and I'm positive no actual recipe was involved, but if any of you kids are looking for "a traditional Polish dish that Grandma used to make," this is probably as close as you're going to come (unless we can get Barb to actually write something down someday**).


*I have theories about why, but that's another conversation.
   I'm guessing fried cheese doesn't count.

**Not gonna happen.

Monday, February 24, 2014

White Bread

Pretty much perfect white bread!

*Makes 2 loaves

INGREDIENTS
3 cups luke-warm water
1/4 cup sugar
1 1/2 Tablespoon yeast
1/3 cup oil
1 Tablespoon salt
6 - 7 cups unbleached ground white wheat flour (you can use regular all-purpose bleached flour with success as well. It will make a softer, less-coarse bread. You will need more all-purpose flour... closer to 8 cups.)
*opt. 1 Tbsp. vital wheat gluten (if using whole white wheat flour, to aid the dough in rising, and not falling when baked.)

DIRECTIONS
In a large mixing bowl, dissolve yeast in warm water and sugar. Let sit 10 minutes. Add the oil. Add the salt and flour starting with 6 cups of flour. Mix all together. Knead the dough thoroughly until all ingredients are incorporated, and dough is smooth, elastic, very slightly sticky, and pulls away from the bowl (6-10 minutes). As you knead the dough, you may add more flour as needed, and repeat the process until dough reaches the desired consistency.

Cover the bowl of dough with a dish towel or plastic wrap and let rise until doubled (an hour or more depending on how warm your kitchen is.) You may speed up this process by placing the covered bowl inside the oven with the oven light on, and another bowl of warm water sitting on the lower rack.

Punch the dough down, divide and and form into 2 loaves. Place the dough in 2 greased bread pans. (I use 9" pans.) Cover and let rise until the top of the dough is an inch or two higher than the bread pans.

Bake at 375 degrees for 25 minutes. Remove the baked loaves from their pans immediately, and place on a cooling rack. Slice, and serve warm with butter and honey.

Store in an air-tight bag. Baked loaves AND bread dough freeze well.

NOTES:

  • Source  (Thanks to Donna S. for her very high recommendation!)
  • I tried the all white flour version and it was pretty excellent.  Soft enough for sandwiches even!
  • It rose way quicker than expected (especially on the 2nd rising) so my loaves were amazonian.  No picture this time, but even with that the texture was excellent.

Wednesday, February 12, 2014

Powdered Laundry Detergent

1 c. Borax
1 c. Arm & Hammer Washing Soda
1 bar of laundry soap, grated (I used Fels Neptha)


  • Grate the laundry bar.  
  • Add the Borax and washing soda, mix it together and put into an airtight container. 


Use 1-2 T. per load.  I use 2T. on really dirty loads and 1T. for the lighter stuff.  Translation?  2T. on the kids’ clothes and 1T. on mine.

Source
Notes:

  • I used a bar of Dr. Bronner's Castile Soap the first time (thanks, Trader Joe's!).  It grated nicely and had a pleasant, kind of minty smell.  Looks like they make other scents as well.  This time I used Fels Naptha just to try it out and because I can get it any any Walmart or grocery store around here for under a buck.  Either works.
  • I used my food processor to grate the soap - fine shredder blade, going slowly to grate it as fine as possible.
  • Then I switched to the chopping blade in the bowl and added the other 2 ingredients.  This made everything an even finer consistency and mixed it.
  • I'm storing it in a mason jar with a dedicated tablespoon measure.
  • I'm kind of liking this version better than the other liquid recipe I've made for the past year or so.  It's much less trouble to make and store.  The ingredients are identical, so it seems to work just as well for me.

Sunday, February 2, 2014

Grandma Rose's Veggie Dip

1 c sour cream
1 c salad dressing (Miracle Whip)
2 tsp. seasoned salt
2 tbls. parsley
2 tsp. chopped onion
2 tsp. dill weed

Mix.  Enjoy.

I forgot how delicious this is! Tangy and dilly!

Warm and Creamy Bacon Dip

8 ounces cream cheese, softened
2 cups Daisy Brand Sour Cream
3 ounces real bacon bits
2 cups shredded Cheddar cheese
1 cup chopped green onion

Preheat the oven to 400 degrees. In a bowl, combine all ingredients. Place the mixture in a 1-quart baking dish. Cover. Heat the dip for 25-30 minutes or until hot. Serve with assorted fresh vegetables, crackers and/or chips.

NOTES:

  • Easy and delicious
  • I kept it warm in a fondue pot instead of baking it.  I first had it at Langfeld's and she had it in a mini crock pot.
  • I used Aldi sour cream so it was a little thinner than it would be with Daisy, but the flavor was the same.


Monday, January 20, 2014

Muffulettas (for a crowd)

Olive Salad
  • 13 oz jar green salad olives
  • 6 oz can black olives
  • 6.5 oz jar kalamata olives
  • 14 oz jar roasted red peppers
  • 1 large stalk celery
  • 16 oz jar Giardiniera (pickled cauliflower salad)
  • 5-6 pepperoncini (optional)
  • olive oil
Sandwiches
  • 3 loaves ciabatta or olive oil focaccia 
  • 1 lb provolone
  • 1 lb mortadella or good quality bologna, thinly sliced
  • 1 lb capicola, thinly sliced (we used prosciutto, but I've used just good deli ham before)
  • 1 lb Genoa salami, thinly sliced
For the olive salad, drain (retain brine) and finely mince all ingredients. Add olive oil and brine until the mixture is moist enough to soak into the bread, but not too wet. Slice the loaves open, spread a generous layer of the salad on the top slice, then layer cheese and meats. Place the bottom slice on top, wrap sandwich, and refrigerate upside down for several hours or overnight to allow the flavors to blend together.

Serves 20 or so if it's your only entree, 30-40 if it's part of a big spread.

Orange-Glazed Crockpot Meatballs

  • 28 oz bag of frozen meatballs
  • 12 oz jar of orange marmalade
  • 1/2 small jalapeno, diced
  • 1/4 cup orange juice
  • 1/4 cup beef broth
  • 3-4 green onions, chopped
  • 1/4 tsp salt
  • 1/4 tsp pepper
Combine all ingredients, cook on low 4-5 hours.

Notes: I doubled this. I think we ended up with 14 adults and 5 kids at the party, and ate maybe 3/4 of what was there.

Friday, January 10, 2014

Crock Pot Sausage and Peppers

12 oz pkg sausage, cut into ¼ in piece
1 green pepper, diced
1 red pepper, diced
1 small onion, diced
2 garlic cloves, minced
1 can Italian diced tomatoes
1 Tbsp Italian seasoning
Instructions
Combine all ingredients in a gallon-sized freezer bag, zip close & place in freezer. When ready to use thaw in fridge overnight. Empty contents into crock-pot and cook on low 6-8 hours. Serve over rice.

NOTES:

  • Sorry, but I didn't get a photo on this one.
  • I'm intrigued by the idea of freeze-ahead meals for the crockpot and decided to start here.  I'll post my findings as I try more.
  • I didn't use the red pepper (just extra green) - too expensive at this time of year.
  • I used Johnsonville Brats, and they were good, but it would probably be better with Italian sausage.
  • Also, I started with room temperature ingredients and cooked it on low for about 7 hours.  This was definitely more time than it needed.
  • It would be very easy to extend with a larger can of tomatoes or more sausage.
  • It was good.  I'd make it again.

Saturday, January 4, 2014

Maker's Mark Mustard

1/4 cup yellow mustard seeds
1/4 cup brown mustard seeds
1/2 cup white wine vinegar
1/4 cup bourbon
2 to 3 tablespoons brown sugar
1/2 teaspoon sea salt
To prepare mustard seeds: In small bowl, combine yellow mustard seeds, brown mustard seeds, vinegar and bourbon. Cover. Let cure at room temperature for 2 to 3 days.
To make mustard: In blender or food processor, combine mustard-seed mixture, brown sugar and salt. Process to desired consistency.

NOTES:
  • Mmmmm!  Sorry we used up your Maker's, Tony, but this is a pretty good use for it.
  • Source
  • See the recipe source for a news article with some other recipes as well, including a yellow ballpark mustard that looks really good.  Reprinted below just in case the article disappears, but not yet tried.

BALLPARK BEER MUSTARD 

Don't let the bright-yellow color fool you. Thanks to mustard powder and hoppy beer, this condiment packs a spicy punch. Swipe this stuff on your next grilled hot dog and don't look back.

Makes 1 pint.

1/2 cup mustard powder
1 cup hoppy beer (see shopper's note)
1/4 cup water
1 1/2 teaspoons turmeric
1 egg
1 teaspoon sea salt
2 teaspoons cornstarch
1 teaspoon lemon juice
2 teaspoons sugar

To prepare mustard powder: In small metal bowl, whisk together mustard powder, beer, water and turmeric until smooth. Cover. Chill overnight.

To make mustard: Bring saucepan with 1 inch of water to a simmer. To mustard-powder mixture, add egg, salt, cornstarch, lemon juice and sugar. Whisk to blend. Place bowl over simmering water. Cook, whisking continuously, for 5 minutes or until mixture starts to thicken. Immediately remove from heat.  I used an India pale ale.

Spicy Honey Mustard

1/4 cup yellow mustard seeds
1/4 cup brown mustard seeds
1/2 cup white wine vinegar
1/4 cup water
1/4 cup honey
1/2 teaspoon sea salt

To prepare mustard seeds: In spice blender or mortar and pestle, grind yellow mustard seeds and brown mustard seeds until most are broken. In small bowl, combine seeds, vinegar and water. Cover. Let cure at room temperature for 24 hours.

NOTES:

  • Did not make a pint as it said
  • More "spicy" than "honey" but definitely good.
  • Source

Whole Grain Mustard

AKA Nick's Craft Mustard

Makes about 2 cups

½ cup apple cider vinegar
¼ cup yellow mustard seeds
¼ cup brown mustard seeds
¼ cup beer or water
2 teaspoons light brown sugar
¾ teaspoon salt

1. Combine vinegar, mustard seeds, and beer in medium bowl. Cover with plastic wrap and let stand at room temperature for at least 8 hours and up to 2 days.

2. Process soaked mustard seeds with sugar and salt in food processor until coarsely ground and thickened, about 1 minute, scraping down bowl as necessary.

3. Transfer mustard to container and let stand at room temperature until it achieves desired spiciness, then refrigerate for up to 2 months.

NOTES:

  • We were in a bit of a hurry to get this started so just lightly processed the seeds in the little electric coffee grinder first and basically skipped the first step.
  • On the "beer or water" option, use beer.
  • Very good, would definitely make again!
  • Source